Mark van Holsteijn 09 Dec, 2019


By default, services are connected to each other via public IPs. In most cases, it’s advised to use private IPs instead. Private IP addresses let devices connect within the same network, without the need to connect to the public internet. This offers an additional layer of protection, making it more difficult for an external host or user to establish a connection.
The Private IP access pattern has been build with Infrastructure as a Service (IaaS) in mind (i.e. virtual machines, VPC, etc). This means that this isn’t so straightforward to implement if you’re using Serverless services.
Examples of Serverless compute services within Google Cloud are:
To solve this problem, Google released a network component that is called Serverless VPC Access. This connector makes it possible for you to connect directly to your VPC network from Serverless environments.
We are using the Serverless VPC Access Connector to create a connection to a CloudSQL database via Private IP. Please note that this is not limited to CloudSQL. Once you have setup the Serverless VPC Access Connector, it is possible to connect to any resources that are available within your VPC.
In this blog post, I’ll guide you in setting this up for Google App Engine Standard Environment.
For the purpose of this blog post, I’m going to create a new VPC with a subnet in europe-west1. Please note that this is not required. You can also reuse your own VPC or the Google Provided Default VPC.
gcloud compute networks create private-cloud-sql \
--subnet-mode custom
In Google Cloud, a VPC is global, but we still need to create subnets to deploy resources in the different Cloud region.
This command creates an subnet in the VPC we created earlier for europe-west1:
gcloud compute networks subnets create private-europe-west1 \
--description=europe-west1\ subnet \
--range=192.168.1.0/24 \
--network=private-cloud-sql \
--region=europe-west1
After we’ve created a VPC with a subnet, we can continue by creating a Serverless VPC Access Connector. We can use the following GCloud command to do this.
gcloud compute networks vpc-access connectors create connector-europe-west1 \
  --network=private-cloud-sql \
  --region=europe-west1 \
  --range=10.8.0.0/28
Note: This command uses some defaults for the number of instances as well as the instance type. Since this could limit your network throughput between your VPC and the Serverless products, it’s recommended to override these properties.
The CloudSQL instances are deployed in a VPC that Google Manages. To use Cloud SQL instances via private IP in your VPC, we need to setup a VPC peering connection with the ‘servicenetworking’ network.
If this is the first time you interact with service networking, you have to enable the API via:
gcloud services enable servicenetworking.googleapis.com
To setup a VPC Peering connection, we first need to reserve an IP range that can be used. We can do this by executing the following command:
gcloud compute addresses create google-managed-services-private-cloud-sql \
--global \
--purpose=VPC_PEERING \
--prefix-length=16 \
--network=private-cloud-sql
This sets up an auto-generated IP address range based on a prefix, it’s also possible to specify the range yourself.
Now that we have an IP range, we can use this to setup a VPC peering connecting with the ‘service networking’ project:
gcloud services vpc-peerings connect \
--service=servicenetworking.googleapis.com \
--ranges=google-managed-services-private-cloud-sql \
--network=private-cloud-sql
Note: This step is specifically for connecting with Cloud SQL over private IP. It can be skipped if you are not connecting with CloudSQL.
Now that we created the necessary network infrastructure, we are ready to create a CloudSQL Database instance.
Using this command, we create a new PostgreSQL database with private ip, in the VPC network we provisioned earlier. In this example, I’ve used ‘secretpassword’ as the root password. For production workloads, I’d recommend using Google Secret Manager or IAM authentication.
gcloud beta sql instances create private-postgres \
--region=europe-west1 \
--root-password=secretpassword \
--database-version=POSTGRES_13 \
--no-assign-ip \
--network=private-cloud-sql \
--cpu=2 \
--memory=4GB \
--async
This operation takes a few minutes. After that, a database can be created in the newly provisioned CloudSQL instance.
gcloud sql databases create test --instance private-postgres
Now that we created the correct networking configuration and the (PostgreSQL) Database has been created, it’s time to update the configuration of our App Engine application.
A hello world application can be cloned here.
To update the configuration of an App Engine Application, we need to change the app.yaml file. This file is located in the root of the project.
The result could look as follows (don’t forget to replace the values for the VPC connector and the database):
runtime: nodejs14

vpc_access_connector:
 name: projects/martijnsgcpproject/locations/europe-west1/connectors/connector-europe-west1
 egress_setting: all-traffic

env_variables:
  PGHOST: 10.39.16.5
  PGUSER: postgres
  PGDATABASE: test
  PGPASSWORD: secretpassword
  PGPORT: 5432
In this example, the database connection information is provided via environment variables. Depending on the library/runtime that you’re using, this may needs to be changed. You provide the username, database, and passwordd settings used in step 4. To get the private IP address reserved for your CloudSQL, you can navigate to the Google Cloud Console and go to the Cloud SQL page.

Now we’ve configured our App Engine specification, we can deploy it. Navigate to the root directory and execute:
gcloud app deploy
This will package your app, upload it to GCP and deploy it to the App Engine Service.
After the app has been deployed, you can automatically navigate to the application by executing:
gcloud app browse
The hello world application only has one endpoint. Once triggered, it sets up a connection with the CloudSQL database and executes a SELECT NOW() query.
Once you navigate to the generated link via the gcloud app browse command, you’ll see:
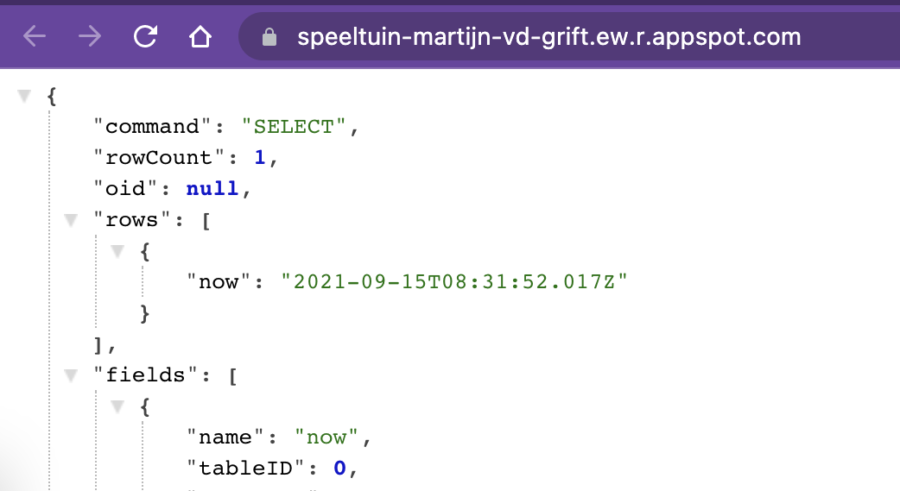
Congrats! Your connection from Google App Engine to a private CloudSQL instance is successful!
While this blog post is about Google App Engine, it’s also possible to use the Serverless VPC Connector with Cloud Run, via:
gcloud run deploy SERVICE_NAME \
--image IMAGE_URL \
--vpc-connector CONNECTOR_NAME
The Service Account that Cloud Run is using must have the following the roles/vpcaccess.serviceAgent role.
Similar to Cloud Run, you can setup a Cloud Function with a Serverless VPC Connector via:
gcloud functions deploy FUNCTION_NAME \
--vpc-connector CONNECTOR_NAME
The Service Account that Cloud Function is using must have the following the roles/vpcaccess.serviceAgent role.
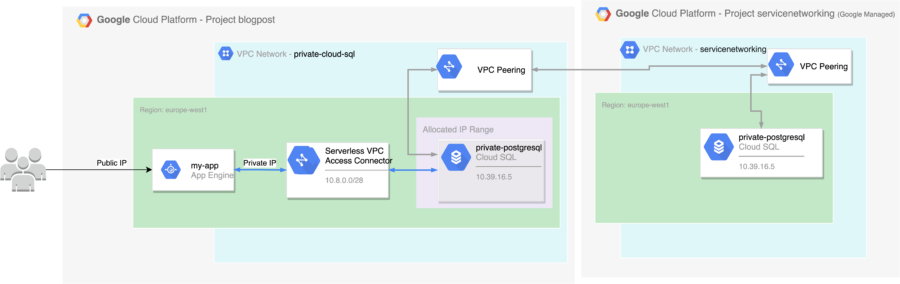
We’ve just learned how to combine Google Cloud’s Serverless products with private IP instances via the Serverless VPC Access Connector.
The diagram below illustrates everything we have created in this blog post.